Scoreduino timer is the most important part of Scoreduino project. It is a countdown timer with four 2.3″ common anode displays. It comes with a buzzer and an LED to indicate the completion of a game. This is a countdown timer for Scoreduino based scoreboards. You can also use it exclusively for any other sports also.
Features:
- It comes with four 2.3″ large displays. The displays are common anode.
- The timer can be set up to 99 minutes and 00 seconds, that is 99:00.
- Comes with a buzzer and an LED to indicate the completion of a game.
- You can operate it using the buttons placed on the top of the circuit board.
- It works with 9V-1A power supply.
- Comes with a HC-06 Bluetooth module.
- The timer is programmable. You will need a separate FTDI basic breakout board to program it. You can use Arduino IDE to program the board.
- It can be operated with two apps:
- Scoreduino’s Scoreduino timer app (designed by BuildCircuit/Sagar Sapkota)
- Arduino Bluetooth controller app


How to operate the timer using buttons ?
The timer can be operated with the buttons available on the board.
There are 5 buttons on the board:
- MIN-UP: Set minutes up
- MIN-DOWN: Set minutes down
- SEC-UP: Set seconds up
- SEC-DOWN: Set seconds down
- STOP/START: Start or stop the timer. When you press stop the timer is paused.
Steps:
- Power up the timer using a 9V-1A AC to DC power adapter.
- By default the timer displays 99:00.
- Press Stop/Start button to start the timer and stop the timer.
- Press MIN-UP button to increase the minutes
- Press MIN-DOWN button to decrease the minutes
- Press SEC-UP button to increase the seconds
- Press SEC-DOWN button to decrease the seconds
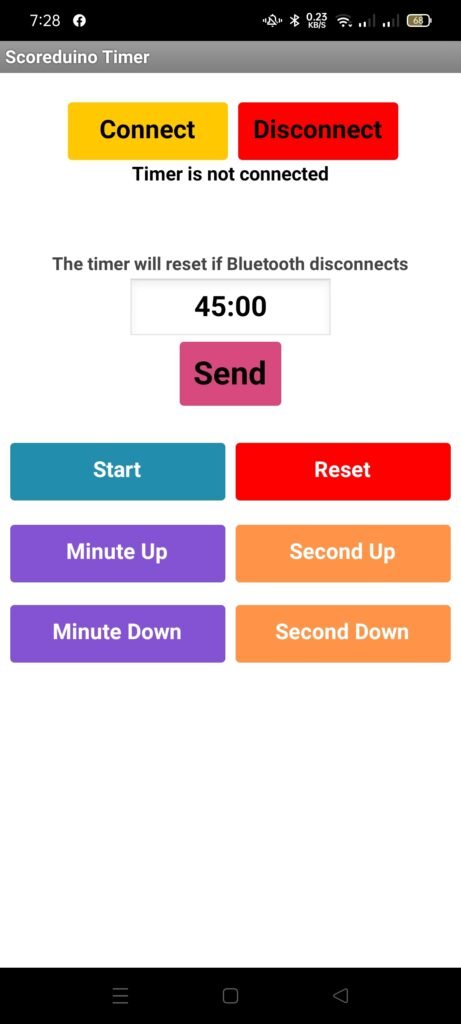
How to operate the timer using Scoreduino’s timer app ?
Step 1: Power up the timer and turn on the 1P DIP (Red switch) on the left side of the board. This will turn on the Bluetooth module
Step 2: Go to your phone’s settings and turn on the Bluetooth function.
Step 3: Search for timer’s Bluetooth. It is either named HC-06 or SCOREDUINO or SCORETIMER. Select the module and pair with it using code 1234.


Step 4: Go to Scoreduino’s timer app and press Connect. Select the Bluetooth module from the list of Bluetooth devices. If the timer is connected, you hear ‘Timer is connected’ sound and the app interface will also display a text ‘Timer is connected’. You will also notice a red flashing LED on the board which indicates the connection between your phone and timer.
Step 5: You will see the text bar has 45:00 by default. You can send the number/time to the timer and the timer will display the number. You can set any other time also.
Step 6: Press the buttons on the app interface according to your requirement.
When the timer reaches 00:00, it will turn on the buzzer and indicator LED.
The timer will reset if the Bluetooth is disconnected.
Video:
Components used in the project:
- 1 x PCB
- 1 x Back plane
- 6 x buttons
- 2 x RED LEDs
- 1 x Flashing LED
- 1 x Yellow LED
- 1 x Buzzer
- 1 x External Buzzer (optional)
- 1 x 1P DIP switch
- 1 x DC barrel
- 2 x 22pF capacitors
- 2 x 10uF capacitors
- 1 x 0.1uF (code:104) capacitor
- 1 x 300mA resettable fuse
- 1 x Heat Sink
- 1 x LM705
- 1 x Bluetooth module
- 1 x 4 pin female angle header
- 1 x 6 pins male header for FTDI basic connection
- 1 x 16Mhz oscillator
- 5 x 2K resistors
- 5 x 10K Ohm resistors
- 2 x 220 Ohm resistors
- 1 x 1K Ohm resistor
- 4 x BC557
- 2 x 16 pins header
- 2 x ULN2003
- 1 x Atmega328P-PU
- 1 x 28 pins IC socket for Atmega328P-PU
- 4 x Common Anode displays
Schematic:


